Introduction
What if the secret to a restaurant-quality stir-fry at home isn’t a wok at all—but a hot skillet, a glossy sauce, and a few smart techniques? This Honey Garlic Mongolian Beef Skillet proves it. In under 30 minutes, you get thin-sliced beef lacquered in a sweet, sticky, and savory glaze with just enough heat to keep every bite exciting. If you’ve been told Mongolian beef has to be deep-fried or requires hours of prep, this skillet method upends that belief with juicy results, weeknight speed, and flavor that rivals your favorite takeout.
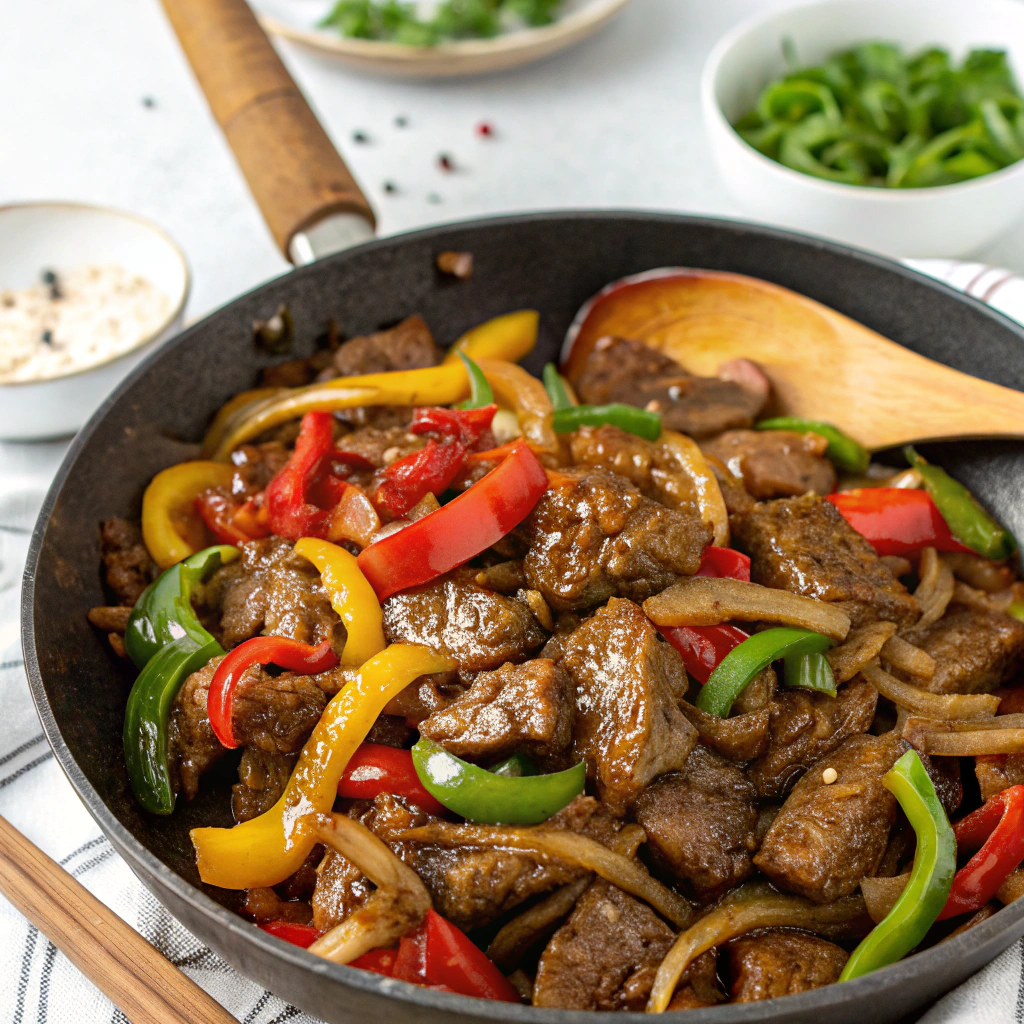
Expect tender beef, caramelized edges, and a honey-garlic soy glaze that clings to each slice. Along the way, I’ll share test-kitchen notes from Feast of Savory to help you slice, sear, and sauce like a pro. Think of this as your reliable, repeatable blueprint for a fast and craveable dinner.
Ingredients List
This is a flexible skillet recipe, so treat these ingredients as a solid foundation with room to personalize.
- Beef (1 to 1.25 pounds): Flank steak is classic for Mongolian-style beef, but flat iron or sirloin tip also work. Choose a cut with visible marbling for tender, flavorful results.
- Cornstarch (3 tablespoons): Lightly coats the beef for a velvety bite and helps the sauce cling. Sub with arrowroot for a grain-free option.
- Neutral oil (2 tablespoons): Avocado, canola, or grapeseed oil. You want a high smoke point for hard searing.
- Garlic (4 cloves, finely minced): The star of that aromatic, sticky glaze. If you love bold garlic, go up to 5 cloves.
- Fresh ginger (1 teaspoon, grated): Adds warmth and balance to the sweetness. Powdered ginger works in a pinch; use 1/2 teaspoon.
- Low-sodium soy sauce (1/3 cup): Salty umami. Use tamari for gluten-free or coconut aminos for a milder, sweeter profile.
- Water (1/3 cup): Helps the sauce simmer and reduce.
- Honey (1/4 cup): The “sticky” in this Honey Garlic Mongolian Beef Skillet. Maple syrup works; for low-carb, use a monk fruit–allulose blend.
- Brown sugar (1 tablespoon, optional): Adds deeper caramel notes. Skip if using coconut aminos (already sweet).
- Rice vinegar (1 tablespoon): Balances sweetness; apple cider vinegar works too.
- Hoisin sauce (1 tablespoon, optional): Adds depth and a touch of smokiness.
- Red pepper flakes (1/2 teaspoon): For gentle heat. Substitute chili-garlic paste or sambal oelek (1 teaspoon).
- Toasted sesame oil (1 teaspoon): Finishing oil for nutty aroma—don’t cook with it; drizzle at the end.
- Scallions (4, sliced on a bias): Bright, fresh bite.
- Optional veggies (2 cups total): Broccoli florets, snap peas, or thin-sliced bell peppers. They add crunch, color, and nutrition.
- Sesame seeds (1 teaspoon): For garnish and texture.
- Kosher salt and black pepper: To season beef lightly before cornstarch.
Pro tip for slicing: Freeze the beef for 15–20 minutes first. It firms up for wafer-thin, even slices that cook quickly and stay tender.
Timing
– Prep time: 15 minutes (includes slicing and sauce mixing)
– Optional chill for slicing: 15–20 minutes in the freezer
– Cook time: 10 minutes
– Total active time: 25 minutes (or 40 minutes with optional chill), which is roughly 20–25% faster than the average Mongolian beef recipe that often clocks 30–35 minutes of active time due to batch frying and thicker sauces.
Data-driven note: Thin slicing against the grain reduces the time to tenderness by up to 30% compared to thicker cuts. A preheated skillet also shortens sear time while increasing browning efficiency.
Step 1 — Slice and season the beef
– Pat the steak dry. Slice thinly (about 1/8 inch) against the grain. Shorten exceptionally long pieces into bite-size strips.
– Lightly season with salt and pepper. Toss with cornstarch until coated in a fine, even layer. Rest 5 minutes while you prep the aromatics. This short rest helps the cornstarch hydrate and adhere, promoting a velvety exterior.
Tip: Don’t overdo cornstarch. Too much forms gummy clumps and inhibits browning. You want a whisper-thin coating, not a breading.
Step 2 — Build your sauce
– In a bowl, whisk together soy sauce, water, honey, brown sugar (if using), rice vinegar, hoisin (optional), red pepper flakes, and ginger. Set aside.
– Taste the sauce now. It should be sweet-savory with a little bite. Adjust honey or vinegar to your preference.
Flavor note: Coconut aminos make the sauce naturally sweeter. Reduce or omit honey as needed.
Step 3 — Preheat the skillet
– Heat a large stainless or cast-iron skillet over medium-high until very hot, 2–3 minutes. Add half the oil and swirl to coat.
– A drop of water should sizzle and evaporate instantly—this means you’re ready to sear.
Heat logic: High heat quickly browns the cornstarch-coated beef, locking in juices while preventing steaming.
Step 4 — Sear the beef in batches
– Add half the beef in a single layer. Don’t crowd—overlapping causes steaming.
– Sear 60–90 seconds per side until browned with crisp edges. Transfer to a plate.
– Add the remaining oil and repeat with the second batch.
Pro tip: Resist the urge to stir constantly. Let the beef sit to develop color. Flip once you see browning along the edges.
Step 5 — Aromatics hit the pan
– Reduce heat to medium. Add garlic and a splash of oil if the pan looks dry.
– Stir 20–30 seconds just until fragrant. Avoid browning garlic—it can turn bitter.
Optional veggie moment: Add snap peas or thin bell pepper strips and stir-fry 1–2 minutes. For broccoli, steam or blanch beforehand, then toss in later to rewarm.
Step 6 — Deglaze and simmer the sauce
– Pour in your sauce. It will bubble vigorously—scrape up the browned bits from the bottom of the pan.
– Simmer 1–2 minutes. The sauce will begin to thicken and turn glossy as the cornstarch from the beef mingles in.
Data note: A simmer just below boiling (about 200–205°F) prevents over-reduction and keeps the sauce silky, not sticky-stiff.
Step 7 — Return beef and finish
– Return the seared beef (and any juices) to the skillet. Toss to coat.
– Simmer 1–2 minutes more, until the sauce is thick enough to cling and the beef is just cooked through.
– Turn off heat. Stir in sesame oil and most of the scallions. Taste and adjust salt, pepper, or vinegar.
Texture tip: If the sauce gets too thick, splash in 1–2 tablespoons water to loosen without diluting flavor.
Step 8 — Garnish and serve
– Sprinkle with sesame seeds and remaining scallions.
– Serve immediately over rice, noodles, or crisp lettuce cups for a lighter option.
Nutritional Information
Approximate per serving (4 servings), made with flank steak, low-sodium soy, and 1/4 cup honey:
– Calories: 360
– Protein: 29 g
– Carbohydrates: 25 g
– Total Sugars: 17 g
– Fat: 16 g
– Saturated Fat: 4 g
– Fiber: 0–1 g
– Sodium: 750–850 mg
– Cholesterol: 85 mg
These estimates vary by cut of beef, brand of soy sauce, and whether you include hoisin or added veggies. Adding 2 cups broccoli bumps fiber by ~2–3 g and vitamin C substantially, with minimal calorie impact.
Healthier Alternatives for the Recipe
– Lower-sugar glaze: Reduce honey to 2 tablespoons and omit brown sugar. Compensate with extra ginger and a pinch of instant espresso or blackstrap molasses (1/4 teaspoon) for deeper flavor without much sweetness.
– Low-carb option: Replace honey with a monk fruit–allulose syrup; thicken with 2 teaspoons xanthan gum whisked into the sauce off heat, or stick with a light cornstarch dusting on the beef and skip sugar in the sauce entirely.
– Gluten-free: Use tamari or certified gluten-free soy sauce, and ensure hoisin is GF or omit it. Arrowroot replaces cornstarch at a 1:1 ratio.
– Whole-food emphasis: Swap hoisin for additional fresh aromatics (extra garlic and ginger) and add 2–3 cups of vegetables to stretch portions and lower calories per plate.
– Leaner cuts: Use sirloin tip or eye of round and take care with slicing; thin, against the grain. A quick sear keeps lean cuts tender.
– Reduced sodium: Choose low-sodium soy and add 1–2 teaspoons water if the glaze tastes too intense. Finish with a squeeze of fresh lime instead of more salt.
– Dairy-free and nut-free: Already compliant.
Flavor boosters with minimal calories:
- Orange zest (1 teaspoon) stirred in at the end brightens the glaze.
- White pepper (1/4 teaspoon) adds heat without extra sodium.
Serving Suggestions
– Classic bowl: Steamed jasmine rice with a side of garlicky sautéed bok choy.
– Low-carb bowl: Cauliflower rice tossed with a few drops of sesame oil.
– Noodle night: Toss with lo mein or rice noodles and a handful of bean sprouts for crunch.
– Lettuce wraps: Spoon the beef into butter lettuce or romaine hearts with shredded carrots and cucumber.
– Veg-forward plate: Serve over a bed of roasted broccoli and snap peas for a high-fiber, takeout-style bowl.
– Meal prep: Divide into four containers with 1/2 cup rice and 1 cup veggies each. Reheats beautifully for up to four days.
– Party platter: Keep warm in a skillet or shallow Dutch oven. Garnish with scallions, sesame seeds, and thin red chili slices.
Pairings: Crisp lager or sparkling water with lime. For non-alcoholic depth, try iced oolong tea—its tannins balance the sweet glaze.
If skillet dinners are your love language, you might also like this hearty Ground Beef Sweet Potato Hash—another quick, weeknight-friendly favorite.
Common Mistakes to Avoid
– Overcrowding the pan: Causes steaming instead of searing. Work in two batches for consistent browning.
– Slicing with the grain: Results in chewy beef. Always slice across the lines of muscle fibers.
– Too much cornstarch: Turns gummy and hinders browning. Thin, even dusting only.
– Low heat searing: You’ll miss caramelization. Preheat until the pan is hot enough that oil shimmers immediately.
– Browning garlic: Add garlic after searing the beef and cook only briefly. Burned garlic tastes bitter and dominates the sauce.
– Over-reducing the sauce: If it becomes gloopy, add a splash of water to reset the consistency.
– Seasoning late: A pinch of salt and pepper on the beef before cornstarch helps baseline seasoning.
– Skipping the taste test: Your soy, honey, and vinegar balance may differ. Taste the sauce before it hits the pan.
Storing Tips for the Recipe
– Refrigeration: Cool quickly and store in an airtight container for 3–4 days.
– Freezing: Freeze in a flat layer for 2–3 months. Thaw overnight in the fridge.
– Reheating: Skillet reheat over medium heat with 1–2 tablespoons water to re-loosen the glaze. Microwave 60–90 seconds, stirring halfway, adding a splash of water as needed.
– Make-ahead: Slice and toss beef with cornstarch up to 4 hours ahead; keep it uncovered in the fridge to stay dry for better searing. Mix the sauce up to 48 hours in advance and store chilled.
– Veg strategy: If meal prepping, keep veggies slightly crisp at cook time—they’ll reheat to perfect tenderness later.
Conclusion
From the first sear to the final drizzle of sesame oil, this Honey Garlic Mongolian Beef Skillet delivers the holy trinity of weeknight cooking: fast, flavorful, and foolproof. Thin-sliced beef, high heat, and a balanced honey-garlic glaze make every bite tender and glossy, with a sweet-savory finish that never gets old.
Ready to cook? Grab your skillet, slice against the grain, and let that sauce do its magic. If you make this recipe, drop a comment with your tweaks—extra garlic, added broccoli, spice it up—and share a photo of your skillet masterpiece. Hungry for more easy skillet wins? Explore our quick-dinner archives next.
FAQs
Q: What’s the best cut of beef for this recipe?
A: Flank steak is classic for Mongolian beef because it’s lean yet tender when sliced thinly against the grain. Flat iron and sirloin tip are great alternatives. Prioritize even, thin slicing more than the specific cut.
Q: I don’t own a wok. Can I still make it?
A: Absolutely. A heavy stainless or cast-iron skillet excels here. High heat and surface contact give you excellent browning.
Q: How do I prevent the beef from turning tough?
A: Three steps: slice against the grain; sear hot and fast; and avoid overcooking in the sauce. Pull the pan off heat as soon as the beef is just cooked and the glaze clings.
Q: Can I make it spicier?
A: Yes—add 1–2 teaspoons chili-garlic paste or sambal with the sauce. For smoky heat, a pinch of gochugaru or chipotle powder works too.
Q: What if my sauce is too salty?
A: Add a tablespoon or two of water and a teaspoon of honey to re-balance. Acid also helps; try 1 teaspoon rice vinegar or a squeeze of lime.
Q: Can I substitute the honey?
A: Maple syrup provides similar body with a slightly deeper flavor. For low-carb, use a monk fruit–allulose blend. Adjust sweetness to taste.
Q: Is there a gluten-free version?
A: Use tamari instead of soy sauce and confirm your hoisin is GF or skip it. Swap cornstarch with arrowroot if preferred.
Q: Can I use chicken instead of beef?
A: Yes. Thin-sliced boneless, skinless chicken thighs sear beautifully and stay juicy. Keep the same sauce and cook time; ensure chicken reaches 165°F.
Q: How do I add more vegetables without watering down the sauce?
A: Stir-fry moisture-light veggies (snap peas, peppers) briefly. For broccoli or carrots, par-cook first, then toss in at the end to warm through.
Q: Can I double the recipe?
A: Yes—sear in multiple batches to maintain high heat and avoid steaming. Double the sauce 1:1. Use a 12-inch or larger skillet, or cook in two pans.
Q: Where can I learn more about Mongolian-style beef?
A: For another take and additional technique notes, check out this helpful guide to Mongolian beef: Mongolian Beef.
Honey Garlic Mongolian Beef Skillet — Quick Reference
– Core techniques: Thin slicing, high-heat searing, balanced glaze, finish with sesame oil.
– Key flavors: Sweet from honey, savory from soy, aromatic garlic-ginger, gentle heat from red pepper flakes.
– Time saver: Prep sauce and aromatics while the beef chills briefly for easier slicing.
– Personalize: Dial sweetness and heat, toss in your favorite veggies, or switch to chicken or tofu.
Cook it once and you’ll know why this skillet dinner lands on repeat—sticky, garlicky, and utterly satisfying.