Introduction
What if the boldest, most satisfying fried rice on a weeknight came from two humble pantry heroes—ground beef and kimchi? Ground Beef & Kimchi Fried Rice proves you don’t need a wok-restaurant setup to deliver sizzling, smoky flavor at home. This umami-packed one-pan dinner balances spicy, tangy kimchi with savory beef, silky sesame, and the buttery richness of a runny egg. Built for speed, craveability, and flexibility, it’s the skillet meal I reach for on busy nights in my Feast of Savory kitchen—especially when day-old rice is waiting in the fridge.
Ingredients List
Think of this as a high-heat “stir-fry meets comfort food” lineup. The ingredients below deliver the signature kimchi bokkeumbap flavor while giving you plenty of smart substitution options.
- Ground beef: 1 lb (85% lean recommended for flavor and browning). Sub: 90–93% lean for lighter, or ground pork, chicken, turkey, or plant-based crumbles.
- Day-old cooked rice: 3 cups, cold and fluffy (jasmine or medium-grain). Sub: brown rice for nuttier chew; quinoa or cauliflower rice for alternatives.
- Kimchi: 1½ cups, well-fermented, chopped, plus 2 tablespoons kimchi juice. Sub: any napa kimchi; radish kimchi adds extra crunch.
- Aromatics:
- Yellow onion: 1 small, finely diced
- Garlic: 4 cloves, minced
- Green onions: 4 stalks, sliced (white parts for the stir-fry, green for garnish)
- Vegetables:
- Carrot: 1 medium, finely diced
- Peas: 1 cup frozen green peas, thawed (or edamame, corn, or diced bell pepper)
- Fats:
- Neutral oil: 2 tablespoons (avocado, canola, or grapeseed) for high-heat searing
- Toasted sesame oil: 1 tablespoon for finishing aroma
- Sauce and seasoning:
- Gochujang: 1½ tablespoons for sweet heat and depth
- Soy sauce: 1 tablespoon (or tamari/coconut aminos for gluten-free)
- Sugar or honey: 1 teaspoon to balance kimchi’s tang (skip if your kimchi is already sweet)
- Rice vinegar: 1 tablespoon (optional, brightens the finish)
- Gochugaru: 1 teaspoon (optional, for extra heat)
- Eggs: 4, fried sunny-side up or over-easy for topping
- Garnishes: Toasted sesame seeds, extra green onions, nori strips (optional)
Flavor note: The magic comes from frying the kimchi to concentrate its funky-sour flavors before adding rice, then finishing with sesame oil for that distinctive nutty aroma.
Timing
– Prep time: 10 minutes (chopping aromatics and kimchi, gathering sauce)
– Cook time: 12–15 minutes (beef browning + rice stir-fry + eggs)
– Total time: 22–25 minutes—about 20–25% faster than many 30-minute weeknight meals, thanks to day-old rice and a single skillet.
Data tip: Stir-fries move fast once heat is on. Pre-measure the sauce (gochujang, soy, kimchi juice, sugar) in a small bowl so you can pour and toss in under 30 seconds.
Step 1: Fluff the rice and set up your mise en place
– Break up 3 cups of cold, day-old rice with clean hands or a fork until grains separate. If clumpy, microwave 20 seconds to loosen; don’t warm fully.
– Chop kimchi and reserve 2 tablespoons of the juice.
– Combine in a small bowl: gochujang, soy sauce, kimchi juice, and sugar. Keep sesame oil and vinegar separate for the finish.
Pro tip: Dry, separate grains are the difference between bouncy fried rice and mush.
Step 2: Get the pan roaring hot
– Heat a large nonstick skillet or wok over medium-high until hot, then add 2 tablespoons neutral oil.
– You should see a faint shimmer and quick wisps of heat. High heat helps build that coveted smoky wok hei flavor—even in a home kitchen.
Step 3: Brown the ground beef for maximum flavor
– Add 1 lb ground beef in a single layer. Let it sear undisturbed for 2 minutes.
– Break into crumbles and cook 3–4 minutes until no longer pink and edges are caramelized.
– If excess fat pools, spoon off a tablespoon or two; you want enough to coat rice but not drown it.
Flavor science: Good browning develops hundreds of flavor compounds, lending savory depth to the kimchi’s tang.
Step 4: Add aromatics to bloom
– Stir in diced onion and cook 1–2 minutes until translucent.
– Add garlic and the white parts of green onions; cook 30–45 seconds until fragrant.
– Sprinkle in carrot and sauté 1 minute. You’re building a savory-sweet base and a little crunch.
Step 5: Fry the kimchi to concentrate flavor
– Push beef and aromatics to one side. Add chopped kimchi to the empty side.
– Cook 2 minutes, stirring occasionally, until slightly caramelized around the edges.
Why it works: Frying reduces excess moisture and intensifies kimchi’s umami and pleasant sourness—key to restaurant-level kimchi fried rice.
Step 6: Sauce and rice—fast and hot
– Pour in the gochujang-soy-kimchi-juice-sugar mixture and toss quickly to coat beef and kimchi.
– Add the rice. Use a firm spatula to break any remaining clumps and fold until every grain is tinted red and glossy, 2–3 minutes.
– Sprinkle in thawed peas and toss 30–60 seconds to warm through.
Heat hack: If steam billows and the pan starts to weep moisture, you’re overcrowding or the heat’s too low. Increase heat and give the rice space.
Step 7: Finish with aroma and balance
– Drizzle toasted sesame oil and rice vinegar, toss 10 seconds, and cut the heat.
– Taste and adjust: a pinch of salt if needed, another teaspoon soy for depth, or a sprinkle of gochugaru for more kick.
– Fold in half of the sliced green onions.
Step 8: Fry the eggs and serve
– In a separate small pan, fry 4 eggs sunny-side up (or in a cleared space in the wok if it’s large).
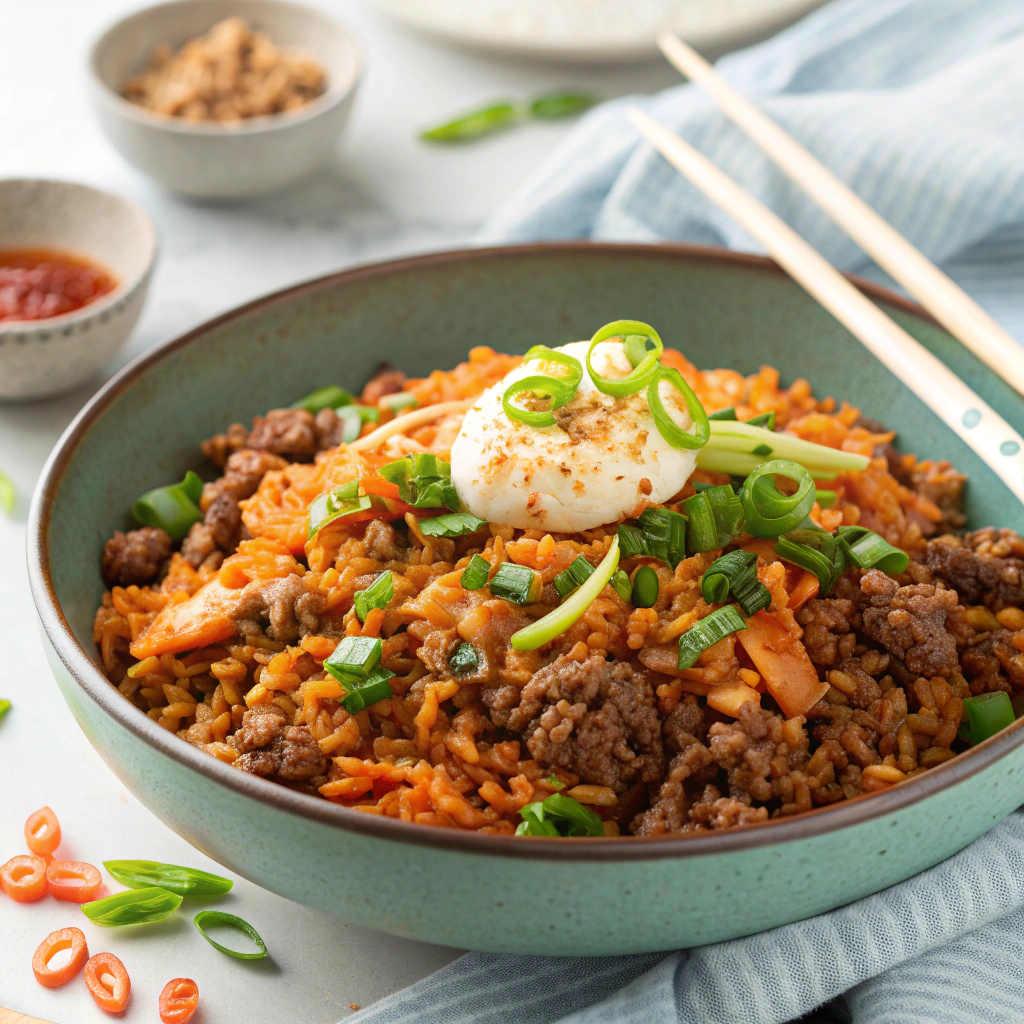
– Plate the fried rice, top with an egg, and garnish with remaining green onions and sesame seeds. Nori strips add a toasty finish.
Serving moment: The runny yolk acts as a built-in sauce, mellowing the chili heat and rounding the dish.
Nutritional Information
Per serving (4 servings, including one fried egg each), approximate:
– Calories: 540
– Protein: 24 g
– Carbohydrates: 61 g
– Dietary fiber: 4 g
– Total fat: 22 g
– Saturated fat: 6 g
– Sodium: ~1,250 mg
– Added sugars: ~3 g
Data insights:
- Most sodium comes from kimchi and soy sauce; choosing low-sodium soy or rinsing extra-briny kimchi can drop sodium by 15–25%.
- Using 93% lean beef reduces total fat by ~5–6 g per serving without sacrificing much flavor.
- Brown rice slightly increases fiber and magnesium, supporting satiety and energy metabolism.
Note: Nutrition varies with kimchi brand, gochujang sodium, beef leanness, and egg size.
Healthier Alternatives for the Recipe
– Leaner protein: Swap in 90–93% lean beef or ground turkey/chicken. Add 1 teaspoon extra sesame oil at the end to preserve richness.
– More vegetables: Double the carrot and add diced zucchini, mushrooms, or bell peppers. You’ll increase volume and fiber while keeping calories steady.
– Whole grains: Use brown jasmine or short-grain brown rice for a pleasantly chewy texture. Cook it a day ahead so it dries out.
– Lower sodium: Use low-sodium tamari and a lightly rinsed kimchi. Increase scallions and sesame for flavor lift instead of salt.
– Lower carb or grain-free: Use 3 cups cauliflower rice; stir-fry 2–3 minutes less to avoid sogginess. Consider half-cauliflower, half-rice for a balanced feel.
– Vegetarian/vegan: Use firm tofu crumbles or plant-based ground. Crisp tofu in the pan first for texture. Swap honey for sugar and top with a jammy vegan “egg” sauce (tahini + turmeric + black salt).
– Extra protein: Stir in edamame or diced cooked chicken thigh along with peas; top with two eggs per serving if desired.
Serving Suggestions
– Garnish game: Extra green onions, sesame seeds, and paper-thin nori strips add color, aroma, and texture.
– Banchan vibes: Serve with cucumber salad, quick pickled radish, or a simply dressed sesame spinach to echo Korean table style.
– Lettuce wraps: Spoon hot Ground Beef & Kimchi Fried Rice into crisp romaine or butter lettuce leaves with a dab of extra gochujang or mayo for a fun, hand-held dinner.
– Brunch twist: Top with a crispy fried egg and a drizzle of maple-gochujang (1 teaspoon gochujang whisked into 2 teaspoons maple syrup) for sweet-heat balance.
– Leftover magic: Press cold leftovers into patties and pan-sear for crispy “rice cakes,” then top with a runny egg or serve with a crunchy slaw.
– Drinks: Ice-cold lager, light-bodied red wine (gamay), or chilled barley tea complement the spice and cut through richness.
Common Mistakes to Avoid
– Using fresh, hot rice: It steams rather than fries, leading to clumps. Cool rice overnight for distinct grains.
– Not heating the pan enough: Lukewarm pans make soggy, oily rice. Preheat until oil shimmers.
– Skipping the kimchi fry: Raw kimchi can taste sharp and watery. Fry 1–2 minutes to sweeten and concentrate flavor.
– Overcrowding: Too much food lowers pan temperature. Use a large skillet or fry in two batches.
– Adding sesame oil too early: It’s a finishing oil. High heat dulls its aroma—drizzle at the end.
– Heavy salting: Remember, kimchi and soy contribute most of the salt. Taste before adding more.
– Neglecting texture: Keep carrots finely diced and rice dry to avoid mushiness; leave some toasty bits for crunch.
– Overcooking eggs: Runny yolks balance spice. Cook just until the whites set.
Storing Tips for the Recipe
– Refrigeration: Store in airtight containers for 3–4 days. Keep eggs separate in a small container.
– Freezing: Freeze fried rice (without eggs) up to 2 months. Portion flat in zip bags for speedy reheats.
– Reheating: Skillet on medium-high with a teaspoon of oil is best; add a splash of water and cover for 30 seconds to re-steam, then uncover to crisp. Microwave works in a pinch—stir halfway.
– Meal-prep strategy: Divide into four containers, add a lemon wedge or extra scallions to brighten at reheat, and keep a mini bottle of sesame oil for a last-second drizzle.
– Food safety: Reheat to 165°F. Don’t leave rice at room temperature more than 1–2 hours.
Conclusion
If you love a fast, flavor-forward skillet dinner, Ground Beef & Kimchi Fried Rice delivers: seared beef, tangy-sweet kimchi, and a silky egg creating the ultimate umami trifecta in under 25 minutes. It’s flexible enough for weeknights, impressive enough for brunch, and endlessly riffable with what you have on hand. Cook it once and you’ll see why it’s a Feast of Savory staple.
Craving more skillet comfort? Try another crowd-pleasing beef-and-veg winner: Ground Beef Sweet Potato Hash. If you make this fried rice, leave a comment with your spin—extra spicy? veggie-loaded? We’d love to hear how you make it yours.
FAQs
– Can I use freshly cooked rice?
– Yes, but spread it on a sheet pan and chill it quickly (15–20 minutes in the freezer) to dry the surface. Day-old rice still fries best.
-
What if I don’t have gochujang?
- Mix 2 teaspoons chili-garlic sauce with 1 teaspoon miso or a touch of soy and honey to mimic sweet heat and fermented depth. It won’t be identical, but it’s close.
-
How spicy is this?
- Medium heat as written. Reduce gochujang to 1 tablespoon and skip gochugaru for mild; add more gochujang or a chopped fresh chili for extra kick.
-
Can I make it gluten-free?
- Yes. Use tamari or coconut aminos and check your gochujang and kimchi labels for gluten-free certification.
-
Best pan for fried rice?
- A carbon steel wok is classic, but a large nonstick or stainless skillet works well. The key is high heat and enough space to toss without steaming.
-
What’s the ideal beef fat level?
- 85% lean strikes a great balance for browning and flavor. Go leaner if you prefer, then add a drizzle of sesame oil at the finish for richness.
-
Can I cook the egg directly in the rice?
- Absolutely. Push rice to the sides, add a teaspoon of oil, crack the eggs in the center, and scramble lightly before folding in. For the iconic yolk sauce effect, a separate fried egg on top is best.
-
Why fry the kimchi separately first?
- Quick frying evaporates moisture and caramelizes sugars, intensifying flavor and keeping rice from going soggy. It’s the biggest quality boost in the recipe.
-
How do I fix rice that’s too salty?
- Fold in a cup of unsalted rice or extra vegetables and a splash of water. A small squeeze of lemon or rice vinegar also brightens and balances salinity.
-
Can I double the recipe?
- Yes, but cook in two batches to keep the pan hot. Combine everything at the end with sesame oil for consistent flavor.
-
Where can I learn more about classic kimchi fried rice techniques?
- For a traditional approach and helpful tips, see this guide: kimchi fried rice.
-
What’s the difference between this and other fried rice styles?
- Kimchi bokkeumbap leans on fermented cabbage for sour heat and gochujang for sweet chili depth, creating a unique, punchy profile versus soy- or oyster-sauce-driven Chinese-style fried rice.
Enjoy building your own signature version of Ground Beef & Kimchi Fried Rice—whether you go leaner, spicier, or veggie-heavier, the core technique stays the same: hot pan, dry rice, fried kimchi, and a fragrant sesame finish.